SecurityConfig를 작성하면서도 찜찜했던 이유
이전 글에서 세션, JWT, OAuth2의 차이를 정리했다. 어떤 인증 방식을 ‘왜’ 선택하는지는 이해했다. 그런데 막상 Spring Security 코드를 작성하면, 여전히 찜찜한 구석이 남았다.
“이 SecurityConfig가 내부적으로 뭘 하는 거지?”
http
    .authorizeHttpRequests(auth -> auth
        .requestMatchers("/admin/**").hasRole("ADMIN")
        .anyRequest().authenticated()
    )
    .formLogin(Customizer.withDefaults());
이 몇 줄이 어떻게 로그인 폼을 띄우고, 비밀번호를 검증하고, 권한을 확인하고, 세션을 만드는 걸까? 마법처럼 동작하니까 마법처럼 깨진다. 설정 하나 바꿨을 뿐인데 로그인이 안 되고, 에러 메시지는 403 Forbidden 한 줄뿐이다.
블랙박스를 열어보기로 했다. Spring Security의 핵심은 결국 하나다. ‘필터 체인(Filter Chain)’.
서블릿 필터: Spring Security 이전의 이야기
Spring Security를 이해하려면 먼저 ‘서블릿 필터(Servlet Filter)’를 알아야 한다. Spring Security는 Spring만의 독자적인 보안 체계가 아니라, 자바 서블릿의 필터 메커니즘 위에 얹혀 있다.
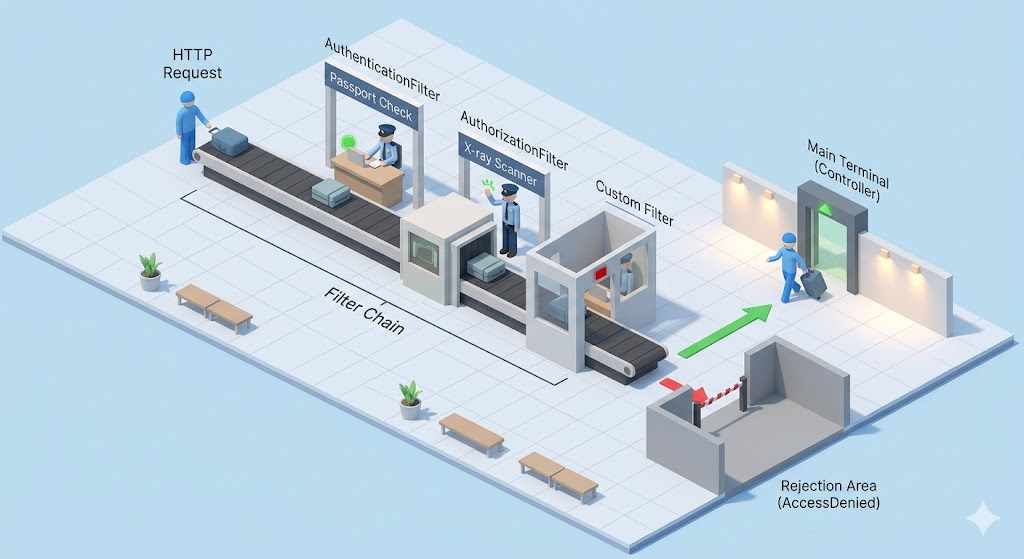
서블릿 필터란 HTTP 요청이 컨트롤러에 도달하기 전에 거치는 ‘관문’이다. 요청이 들어오면 필터들이 순서대로 실행되고, 모든 필터를 통과해야 비로소 컨트롤러에 도착한다.
[클라이언트] → [필터 1] → [필터 2] → [필터 3] → [DispatcherServlet] → [컨트롤러]
                                                       ↑
                                              Spring MVC 영역
필터는 요청을 가로채서 세 가지 중 하나를 할 수 있다.
- 다음 필터로 넘긴다 (chain.doFilter)
- 요청을 거부한다 (응답을 직접 써서 반환)
- 요청/응답을 변조한다 (헤더 추가, 로깅 등)
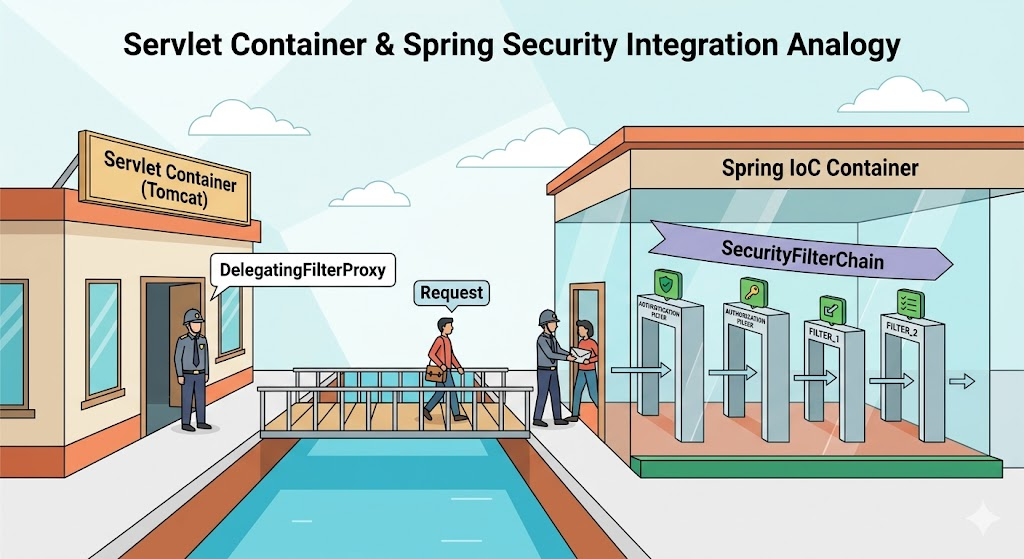
Spring Security는 이 서블릿 필터 자리에 자신의 필터들을 등록한다. 정확히 말하면, ‘DelegatingFilterProxy’라는 서블릿 필터 하나를 등록하고, 이 필터가 Spring Security의 필터 체인 전체를 위임받아 실행한다.
[서블릿 컨테이너의 필터 체인]
  ├── CorsFilter
  ├── DelegatingFilterProxy  ←── 여기서 Spring Security로 위임
  │     └── FilterChainProxy
  │           └── SecurityFilterChain  ←── Spring Security의 필터들
  │                 ├── SecurityContextPersistenceFilter
  │                 ├── UsernamePasswordAuthenticationFilter
  │                 ├── BasicAuthenticationFilter
  │                 ├── AuthorizationFilter
  │                 └── ...
  └── 기타 필터들
왜 이렇게 복잡하게 만들었을까? 서블릿 필터는 서블릿 컨테이너(Tomcat)가 관리하고, Spring Security의 필터들은 Spring IoC 컨테이너가 관리한다. 두 세계를 연결하는 다리가 DelegatingFilterProxy인 것이다.
SecurityFilterChain: 필터들의 순서
Spring Security의 핵심은 SecurityFilterChain이다. 이 안에 약 15개의 필터가 순서대로 배치되어 있다. 모든 HTTP 요청은 이 필터들을 위에서 아래로 통과한다.
전체를 외울 필요는 없다. 실무에서 자주 만나는 핵심 필터만 이해하면 된다.
| 순서 | 필터 | 역할 | 비유 |
|---|---|---|---|
| 1 | SecurityContextPersistenceFilter | 이전 요청의 인증 정보 복원 | 재방문 고객 기록 확인 |
| 2 | CorsFilter | CORS 헤더 처리 | 외국인 입국 허가 확인 |
| 3 | CsrfFilter | CSRF 토큰 검증 | 위조 신분증 검사 |
| 4 | LogoutFilter | 로그아웃 요청 처리 | 퇴장 절차 |
| 5 | UsernamePasswordAuthenticationFilter | 폼 로그인 처리 | 여권 심사대 |
| 6 | BasicAuthenticationFilter | HTTP Basic 인증 | 간이 신분 확인 |
| 7 | BearerTokenAuthenticationFilter | JWT/OAuth2 토큰 검증 | 전자 여권 스캐너 |
| 8 | AuthorizationFilter | URL별 권한 확인 | 구역별 출입 통제 |
| 9 | ExceptionTranslationFilter | 인증/인가 예외 처리 | 거부 시 안내 데스크 |
중요한 것은 ‘순서’다. 인증(5~7번)이 먼저 일어나고, 인가(8번)가 그 다음이다. 인증되지 않은 요청이 인가 필터에 도달하면, ExceptionTranslationFilter가 이를 잡아서 로그인 페이지로 리다이렉트하거나 401 응답을 보낸다.
실제 요청이 필터를 통과하는 과정
폼 로그인을 예로 들어 요청이 어떻게 처리되는지 따라가 보자.
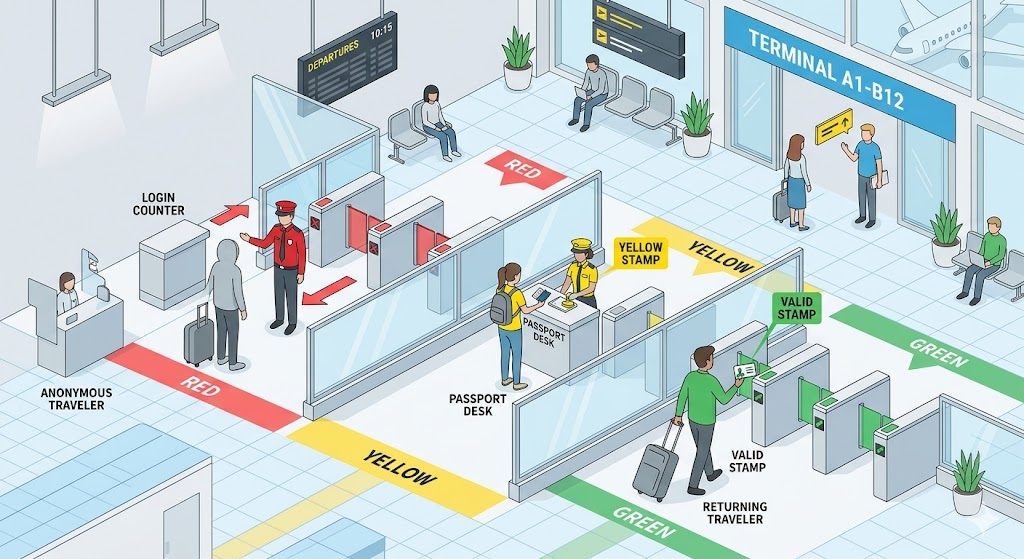
시나리오 1: 로그인하지 않은 사용자가 /admin에 접근
1. GET /admin 요청 도착

2. SecurityContextPersistenceFilter
   → 세션에서 인증 정보 확인 → 없음 (익명 사용자)

3. CsrfFilter → 통과 (GET 요청은 검증 안 함)

4. UsernamePasswordAuthenticationFilter
   → /login POST가 아니므로 통과

5. AuthorizationFilter
   → /admin/** 은 ADMIN 권한 필요
   → 현재 사용자: 익명 → 접근 거부!

6. ExceptionTranslationFilter
   → AccessDeniedException 감지
   → 인증 자체가 안 된 상태이므로 → /login 으로 리다이렉트
시나리오 2: 사용자가 로그인 폼을 제출
1. POST /login (username=admin, password=1234) 요청 도착

2. SecurityContextPersistenceFilter → 인증 정보 없음

3. CsrfFilter → CSRF 토큰 검증 → 통과

4. UsernamePasswordAuthenticationFilter ← 여기서 처리!
   → /login POST 요청 감지
   → username, password 추출
   → AuthenticationManager에게 인증 위임
   → AuthenticationManager → UserDetailsService 호출
   → DB에서 사용자 조회, 비밀번호 비교
   → 성공 시 Authentication 객체 생성
   → SecurityContext에 저장
   → 세션에 SecurityContext 저장
   → 성공 URL(/admin)로 리다이렉트

   (이후 필터는 실행되지 않음 - 리다이렉트 응답이 나갔으므로)
시나리오 3: 로그인 완료 후 다시 /admin 접근
1. GET /admin 요청 도착 (세션 쿠키 포함)

2. SecurityContextPersistenceFilter
   → 세션에서 SecurityContext 복원
   → Authentication 객체 존재 (admin, ROLE_ADMIN)

3. CsrfFilter → 통과

4. UsernamePasswordAuthenticationFilter → 통과

5. AuthorizationFilter
   → /admin/** 은 ADMIN 권한 필요
   → 현재 사용자: admin, 권한: ROLE_ADMIN → 접근 허용!

6. DispatcherServlet → AdminController 실행 → 응답
SecurityConfig가 필터 체인을 만드는 방법
우리가 작성하는 SecurityConfig는 사실 ‘필터 체인을 조립하는 설명서’다. HttpSecurity 객체의 메서드 하나하나가 특정 필터를 활성화하거나 설정하는 것이다.
@Bean
public SecurityFilterChain filterChain(HttpSecurity http) throws Exception {
    http
        // CsrfFilter 비활성화
        .csrf(csrf -> csrf.disable())

        // SessionCreationPolicy 설정 → SecurityContextPersistenceFilter 동작 변경
        .sessionManagement(session -> session
            .sessionCreationPolicy(SessionCreationPolicy.STATELESS))

        // 커스텀 필터 추가 → 필터 체인에 JwtAuthFilter 삽입
        .addFilterBefore(new JwtAuthFilter(),
            UsernamePasswordAuthenticationFilter.class)

        // AuthorizationFilter 설정
        .authorizeHttpRequests(auth -> auth
            .requestMatchers("/auth/**").permitAll()
            .anyRequest().authenticated()
        );

    return http.build();
}
| SecurityConfig 코드 | 영향받는 필터 | 효과 |
|---|---|---|
| .csrf(csrf -> csrf.disable()) | CsrfFilter | 필터 제거 |
| .formLogin(…) | UsernamePasswordAuthenticationFilter | 필터 활성화 + 설정 |
| .sessionManagement(…STATELESS) | SecurityContextPersistenceFilter | 세션에서 인증 정보 안 읽음 |
| .addFilterBefore(A, B) | 커스텀 필터 A | B 앞에 A 삽입 |
| .authorizeHttpRequests(…) | AuthorizationFilter | URL별 권한 규칙 설정 |
| .oauth2Login(…) | OAuth2LoginAuthenticationFilter | OAuth2 필터 활성화 |
이것을 알면 디버깅이 훨씬 쉬워진다. “로그인이 안 된다”는 문제를 만나면, 이제 “어느 필터에서 막히는가?”로 좁혀갈 수 있다.
디버깅: 필터 체인 들여다보기
Spring Security가 어떤 필터를 등록했는지 확인하는 방법이 있다.
방법 1: 로그 레벨 조정
# application.yml
logging:
  level:
    org.springframework.security: DEBUG
이 설정을 켜면 모든 요청에 대해 어떤 필터가 실행되는지 로그로 확인할 수 있다.
DEBUG --- SecurityFilterChain [DefaultSecurityFilterChain]
  matched request [GET /admin]
  with filters:
    DisableEncodeUrlFilter
    WebAsyncManagerIntegrationFilter
    SecurityContextHolderFilter
    HeaderWriterFilter
    CsrfFilter
    LogoutFilter
    UsernamePasswordAuthenticationFilter
    ...
    AuthorizationFilter
방법 2: 필터 목록 출력
@Component
public class SecurityFilterLogger implements CommandLineRunner {

    private final List<SecurityFilterChain> filterChains;

    public SecurityFilterLogger(List<SecurityFilterChain> filterChains) {
        this.filterChains = filterChains;
    }

    @Override
    public void run(String... args) {
        for (SecurityFilterChain chain : filterChains) {
            System.out.println("=== SecurityFilterChain ===");
            chain.getFilters().forEach(filter ->
                System.out.println("  " + filter.getClass().getSimpleName())
            );
        }
    }
}
이 코드를 추가하면 애플리케이션 시작 시 등록된 모든 필터가 순서대로 출력된다.
실무 조언: Spring Security에서 자주 실수하는 것들
1. 필터 순서를 무시하고 커스텀 필터를 넣는 실수
JWT 인증 필터를 만들어서 addFilterBefore 대신 addFilterAfter로 넣으면, AuthorizationFilter 뒤에 인증 필터가 위치하게 된다. 이러면 인가가 먼저 일어나고 인증이 나중에 실행되어, 모든 요청이 403으로 거부된다.
// 잘못된 예
.addFilterAfter(new JwtAuthFilter(), AuthorizationFilter.class)
// JwtAuthFilter가 너무 늦게 실행됨 → 인증 전에 인가가 일어남

// 올바른 예
.addFilterBefore(new JwtAuthFilter(), UsernamePasswordAuthenticationFilter.class)
// 폼 로그인 필터 자리에 JWT 필터를 대신 배치
2. CSRF를 무조건 끄는 실수
JWT를 쓰면 “CSRF 끄세요”라는 가이드가 많다. 이것 자체는 맞다. JWT는 쿠키가 아니라 Authorization 헤더로 전송하므로 CSRF 공격에 해당하지 않는다. 하지만 세션 기반 인증에서 CSRF를 끄면 보안 구멍이 생긴다.
// JWT 사용 시 → CSRF 비활성화 OK
.csrf(csrf -> csrf.disable())
.sessionManagement(s -> s.sessionCreationPolicy(SessionCreationPolicy.STATELESS))

// 세션 사용 시 → CSRF 반드시 유지
.csrf(Customizer.withDefaults())  // 기본값이 활성화
.formLogin(Customizer.withDefaults())
규칙은 단순하다. Stateless(JWT)면 CSRF 끄고, Stateful(세션)이면 CSRF 켜둔다.
3. 403과 401을 구분하지 않는 실수
Spring Security에서 403(Forbidden)과 401(Unauthorized)은 다른 상황이다.
| 코드 | 의미 | 상황 |
|---|---|---|
| 401 | 인증 안 됨 | 로그인을 안 했거나 토큰이 없음 |
| 403 | 인가 안 됨 | 로그인은 했지만 권한이 없음 |
그런데 Spring Security는 기본적으로 둘 다 403을 반환하는 경우가 있어서 혼란스럽다. 이를 명확히 분리하려면 ExceptionTranslationFilter의 동작을 커스터마이징해야 한다.
http
    .exceptionHandling(ex -> ex
        .authenticationEntryPoint((request, response, authException) -> {
            response.setStatus(HttpServletResponse.SC_UNAUTHORIZED);  // 401
            response.getWriter().write("인증이 필요합니다.");
        })
        .accessDeniedHandler((request, response, accessDeniedException) -> {
            response.setStatus(HttpServletResponse.SC_FORBIDDEN);  // 403
            response.getWriter().write("접근 권한이 없습니다.");
        })
    );
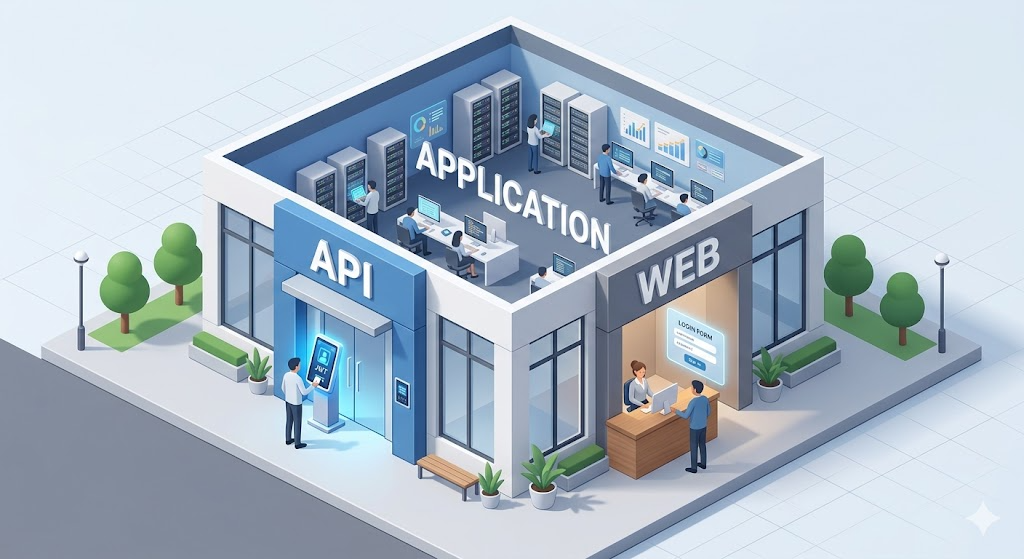
4. 다중 SecurityFilterChain 활용
API 경로와 웹 페이지 경로에 서로 다른 보안 정책을 적용해야 할 때, SecurityFilterChain을 여러 개 등록할 수 있다.
@Bean
@Order(1)  // 먼저 매칭 시도
public SecurityFilterChain apiFilterChain(HttpSecurity http) throws Exception {
    http
        .securityMatcher("/api/**")
        .csrf(csrf -> csrf.disable())
        .sessionManagement(s -> s.sessionCreationPolicy(SessionCreationPolicy.STATELESS))
        .addFilterBefore(new JwtAuthFilter(), UsernamePasswordAuthenticationFilter.class)
        .authorizeHttpRequests(auth -> auth.anyRequest().authenticated());

    return http.build();
}

@Bean
@Order(2)  // API에 매칭 안 되면 여기로
public SecurityFilterChain webFilterChain(HttpSecurity http) throws Exception {
    http
        .authorizeHttpRequests(auth -> auth
            .requestMatchers("/admin/**").hasRole("ADMIN")
            .anyRequest().permitAll()
        )
        .formLogin(Customizer.withDefaults());

    return http.build();
}
API 요청은 JWT로, 웹 페이지는 세션/폼 로그인으로. 하나의 애플리케이션에서 두 가지 인증 방식을 깔끔하게 분리할 수 있다.
마치며: 블랙박스를 열면 디버깅이 된다
Spring Security가 어렵게 느껴졌던 건, 내부가 어떻게 돌아가는지 모른 채 설정만 복사해서 썼기 때문이다. 필터 체인이라는 구조를 알고 나면, SecurityConfig의 한 줄 한 줄이 어떤 필터를 만들고, 어떤 순서로 실행되는지가 보인다.
정리하면 이렇다.
- Spring Security는 서블릿 필터 위에 만들어진 보안 프레임워크다.
- DelegatingFilterProxy가 서블릿과 Spring을 연결한다.
- SecurityFilterChain 안에 약 15개의 필터가 순서대로 배치된다.
- SecurityConfig의 각 메서드는 특정 필터를 활성화/설정/제거한다.
- 문제가 생기면 “어느 필터에서 막히는가?”로 접근한다.
다음 글에서는 이 보안 체계 위에서 실제로 데이터를 다루는 이야기로 넘어간다. JPA로 간단한 쿼리는 잘 돌아가는데, 검색 조건이 동적으로 바뀌는 순간 코드가 지저분해지기 시작한다. QueryDSL이 이 문제를 어떻게 해결하는지 알아보자.