The screen being drawn is not magic
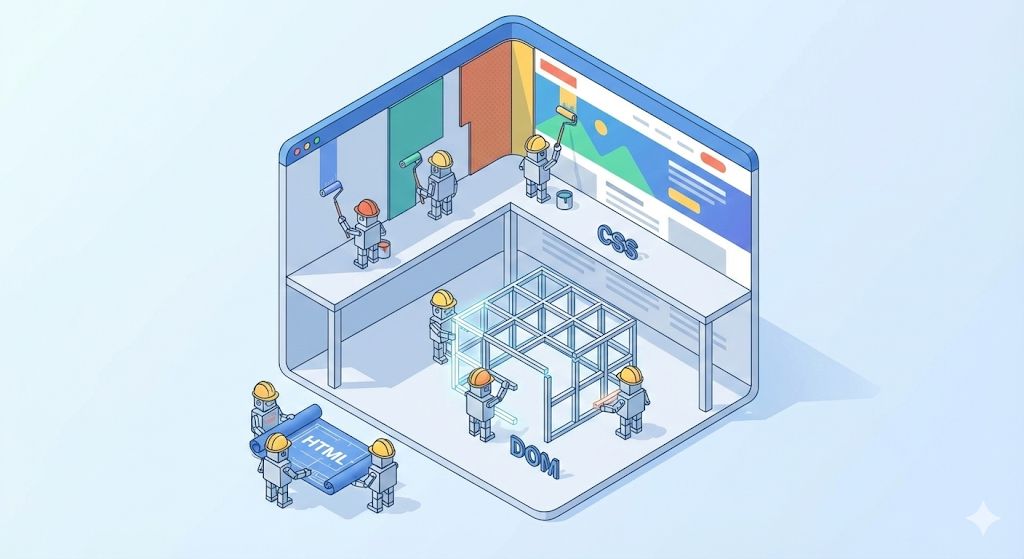
When I first started front-end development (Vue.js), I thought of the browser as just a ‘frame for displaying code.’ It was natural that if you used However, my thoughts changed as I experienced in practice the animation stuttering or the screen jerking when scrolling (jank). “Why does the same code run smoothly in Chrome but crash in Internet Explorer (IE)?” “Why does my CPU skyrocket when I change the style just a little bit with JavaScript?” It turns out that the browser is not just a picture frame. The browser was a huge ‘Painter’ and ‘Architect’ that interpreted the text (HTML/CSS) we sent, mathematically calculated each pixel, and printed it out. Last time, we safely delivered data through rough network roads. This time, let’s open the data box (packet) that arrived and find out how the browser draws a picture called the screen. This is the final story in the Re: Booting CS Basics series. In our ‘digital logistics center’ worldview, the product (HTML file) has now arrived at the customer’s home (browser). However, what arrived was not a finished product, but an ‘assembly manual’. The work team called the browser engine (rendering engine) reads this manual and immediately begins assembly. This process is called the rendering pipeline. Reads the HTML text that arrives first and creates a ‘skeleton’. Then, read the CSS file and create ‘style rules’. Now we combine the skeleton (DOM) and design (CSSOM). The important point here is that only ‘things that will actually appear on the screen’ are selected. Now is the really important step. The key to performance optimization lies here. Once the render tree is created, the browser performs two heavy tasks. Let’s feel the difference in cost with the code. Analysis: In practice, most cases of “stuttering animation” occur because layout properties such as I didn’t know this when I was in college, so I randomly manipulated the DOM with JavaScript. By going through the Tips to ensure performance: With this article, the [Re: Booting] CS Basics Series has come to an end. We went on a long journey together. At first, it was just knowledge that I memorized to get a job. However, after encountering errors in practice and looking again, CS (computer engineering) was not a dead letter, but a solid ground that supported my code. The foundation work is now complete. It is time to build your own castle on solid ground. In the next series [Monolith Builder], I will cover building web applications using Spring Boot and Vue.js, which I have experienced in practice. Please look forward to the process of turning ‘theory’ into ‘practice.’color: red, it would become red.
Cargo arrived, assembly begins
Step 1: Blueprint Analysis (Parsing & DOM Tree)
<html> is the root, <body> is the trunk, <div> is a branch…Step 2: Interior Design (CSSOM Tree)
div is red,” “Anything with the class box is 100px in size”Step 3: Create a work order (Render Tree)
display: none? It won’t show up on the screen, so it is excluded from the render tree. (It doesn’t take up any space either.)visibility: hidden, on the other hand? It’s invisible but still takes up space, so it is included in the render tree.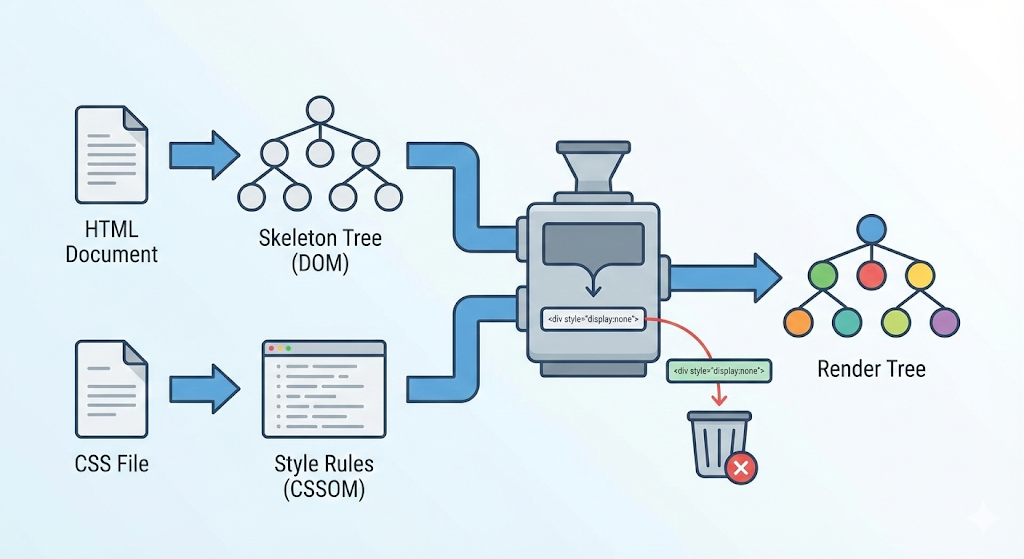
[Code Verification] Reflow and Repaint
const box = document.getElementById('box');
// Case 1: Code that triggers layout (Reflow) (expensive!)
// When size or position changes, surrounding elements must be recalculated.
box.style.width = '200px';
box.style.height = '200px';
box.style.margin = '20px';
// Case 2: Code that only triggers paint (Repaint) (relatively cheap)
// Keep the position, only change color. No calculation — just repaint.
box.style.backgroundColor = 'blue';
box.style.color = 'white';
box.style.visibility = 'hidden';
width: This is construction work that changes the size of a building. The building next door gets pushed aside, and so does the one next to that. The browser has to crunch all the numbers again from scratch. (Triggers Reflow -> the main culprit behind poor performance)color: The building stays the same size and only gets a fresh coat of paint. There is nothing to calculate. (Triggers Repaint -> fast)width, left, and top are touched in real time. In this case, a technique is needed to skip the layout calculation by using properties such as transform.Practical advice: Don’t bully your browser
for statement, I changed the size and style of each element. From the browser’s perspective, it is like being tortured by destroying and rebuilding a building dozens of times per second.
class in advance and change className just once.left and top, use transform: translate(). The layout step is skipped and the GPU takes care of it.display: none (excluded from the render tree) when you want to get rid of an element entirely, and visibility: hidden (included in the render tree) when you just want to leave its spot empty.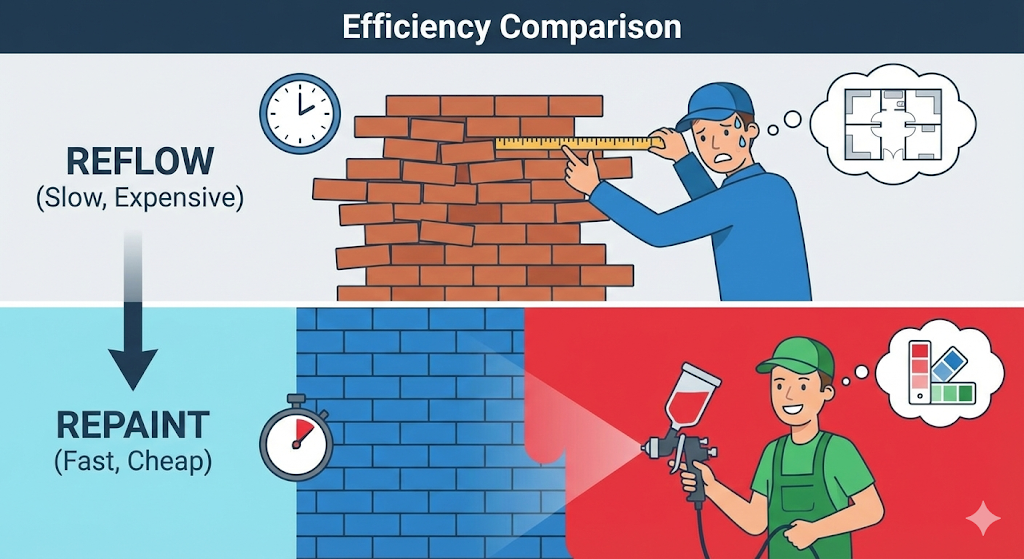
Concluding Series 1: My CS Rebooted